For a little over a month now, I’ve been looking at my AdSense
earnings in Google Analytics to better understand my earnings, and I’ve
stumbled across some rather interesting results. Without even realising
it, I’ve come up with even more ways to increase my AdSense earnings
each month. They range from simple ad placement, to writing specific
posts, and appealing to a certain referrer. Here’s how you can increase
YOUR earnings.
Table of Contents
- Setting Up
- Tip #1 – Appeal To Your Top Referrers
- Tip #2 – Write Content That Links Within Your Site
- Tip #3 – Text and Image Ads
- Tip #4 – Increase Ad Size
- Tip #5 – Ad Placement
Setting Up
The first thing you’ll want to do is set up your AdSense so that you
can study it in more detail, in Analytics. To do this, when you’re
viewing your report overview, just click the link to integrate Adsense
with your Analytics account. It’s just one click and then a small amount
of information on your Analytics account. You have to be an admin on
your Analytics account, otherwise it won’t let you make the
changes necessary, but if you’re the only person running the website,
this shouldn’t be a problem. NOTE: Because you’re adding new
information, GA will not transfer over details from the past, you will
only see new results from when your join the two together.
Now that you’re set up, it’s best to have a run down of what all the terms mean, so that you can understand your results better.
AdSense Revenue is the amount of money you’ve made in your selected time period .
/ 1000 visits, is how much money you’ve made for every 1000 visits to your site.
Ads clicked, is the amount of ads clicked by viewers.
Ads clicked / visit, is the total number of visits, divided by the number of ads clicked.
CTR stands for Click Through Rate and this is the percentage of clicks you get for each ad impression.
eCPM stands for effective Cost Per 1000 impressions (M being a roman numeral). It’s the total earnings per 1000 impressions.
AdSense Ads Viewed is the total number of ads seen, from all multiple ads on all the pageviews.
AdSense Unit Impressions / Visit is the number of ads that are viewed by visitors, per visit.
AdSense Page Impressions is the amount of pages viewed that have AdSense ads on them.
AdSense Page Impressions / Visit is similar to pages viewed per visit, only it’s pages with ads viewed, per visit.
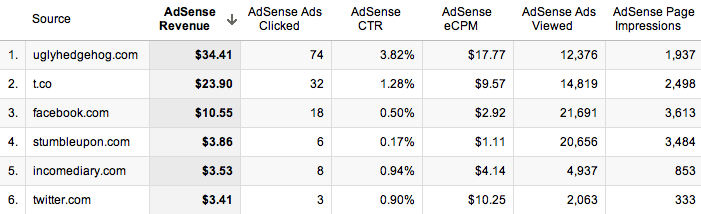
Tip #1 – Appeal To Your Top Referrers
By far, my favourite thing about using Analytics to look at your
AdSense, is that you can then find out which of your referrers are worth
the most in terms of AdSense revenue.When you go into the new
GA, click on Content, then AdSense, then AdSense Referrers, this will
bring up a list of all the websites that sent visitors who have clicked
on an ad, as well as a timeline of your earnings. The most important part of the results isn’t the
ads clicks, viewed, or even the revenue; it’s the Click Through Rate
(CTR) and eCPM (effective Cost Per 1000 impressions).
The CTR is the percentage of ads that are
clicked, per impression, so you want that to be as high as possible. The
reason the CTR is much higher than some of the other referrers is
because of the quality of visitor that I’m receiving from that referrer.
StumbleUpon has a particularly poor CTR, because the people who use it
aren’t looking for anything in particular so it’s hard to get their
attention, which may result in them clicking on an ad.
The eCPM is also substantially higher than the other referrers, which
tells me that if I can increase the number of impressions that I’m
getting from them, then I will earn a lot more money. The quality of
Twitter user is usually pretty poor, as they don’t typically spend too
much time on the site (00:01:47), and even though a link a lot to my
website around 10 times a day through Twitter, I still get less traffic
from them than Facebook. Facebook on the other hand has a better
quality of visitor, with people looking at more pages and staying for
longer (00:02:29, but their eCPM is actually lower than that of Twitter.
People are
less likely to click on ads when they’ve come from websites such as
Facebook, as they’re more interested in the content that you’ve written.
They provide a good quality of visitor, but their time on site is
almost half that of the forum in my niche, so it’s important to find a
good balance of visitor quality. Twitter users seem to behave
differently to other users, as they’re in a browsing mode, and are
clicking on content that they see in their feed before it disappears. It
would appear that they treat the websites they visit in a similar way,
by clicking on more ads. I actually get more traffic from Facebook, but
my earnings from Twitter far outweigh those of Facebook, which is good
really, because it’s much more acceptable to post multiple links on
Twitter.
Tip #2 – Write Content That Links Within Your Site
This step produced shockingly good results for my earnings. This meant that anyone who had
viewed the page would have to click on another if they wanted to learn
anything. This forced them to increase their pages per visit, which
produces more ad impressions.

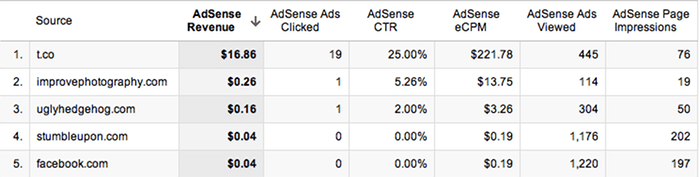
When I break down my earnings so that I’m only receiving information
from the 6th of November, I can start to see which referrer is earning
me the most money. T.co is the URL shortener that Twitter uses, so I can
see clearly that a small number of page impressions has yielded very
strong earnings. With a large number of clicks from 76 page impressions,
I have an unusually high CTR. From this response, I can see that to
earn money, this is the sort of content that I need to be promoting,
though as many sources as I can. I’m currently combining this content,
with the forum mentioned in the tip above, so that I can drive top
quality traffic, to the content that earns me the most money. After just
2 days of doing this, I’m already starting to notice a massive
improvement.
Tip #3 – Text and Image Ads
Enabling your ad units to display both text and image/rich media ad
types, increases the number of ads competing to appear on your site.
More advertisers in the ad auction drives higher bids and more revenue
for you. On average, publishers see a 59% increase in eCPM earnings when
they make these recommended changes. If you’re not already using both,
then it’s as simple as going into the ‘My ads’ tab, and clicking on
‘Edit ad type’, next to the ad in the list. This will increase the cost
per click, so even if you’re not improving the number of clicks that
your website is getting, you’ll still make more money.
Tip #4 – Increase Ad Size
Advertisers prefer wider ad units for their premium inventory,
resulting in higher bids for your ad placements. Though all sites are
different, publishers typically see 0.35 eCPMs when using the wider ad
size. You can start by simply changing single ads on popular pages to
see how well they work, and if it’s not too intrusive, then you can
start rolling it out across your whole website. I didn’t do this in my
sidebar because I was aware that the whole width of the sidebar would
have to change, and that would not only take a lot of time, but mess up
the spacing that I had laid out for posts. Instead, I added a wider ad
at the end of each post, that differs to all the other ads on my
website, and this saw a good improvement in ad sales.
Tip #5 – Ad Placement
Where you choose to place the ad on your site will make a big
difference to the amount of clicks that you get, because the more
obvious the ad, the more likely someone will be to see it. It’s hard to
judge on your own website because we look at our sites differently to
how other people view them, so the best way to start seeing results, is
to experiment with ad placement. When I first started, I had two ads on
my website, one at the top of the sidebar, and one at the bottom. Since
then, we’ve added another ad to the side bar, and reloated the bottom
one to under the subscribe button, added an ad to the bottom of each
post, and put a small text ad just below our header.
The small text ad below our header made the biggest difference to our
results because it stands out the most to new visitors, and could even
be possibly mistaken for a link within our own website. It’s a very
simple ad, and less appealing than a flash one, but it’s much less
intrusive, and in a better position. Overall, I don’t like to add too
many ads because I don’t want to put off visitors or make my website
look bad. I always find it odd when people choose to include an ad block
in their header, because that makes me find their website much less
appealing.

 The
Whatsapp voice calling is not different from Viber, Skype, Line or
other services, but it has many more users than these. Therefore, there
is a scope of using this feature by many users and many can interact
with their circle using Whatsapp voice calling.
The
Whatsapp voice calling is not different from Viber, Skype, Line or
other services, but it has many more users than these. Therefore, there
is a scope of using this feature by many users and many can interact
with their circle using Whatsapp voice calling.


